Monday, December 12, 2016

INTRO TO INTERIOR PROJECTS (FINAL)

NAME: PATRICK YONG KIM ONG
STUDENT ID : 0328667


INSECT : HORNET
My detail insect drawing with 3 part of hornet body zoom out which is abdomen, wing, head.
MASCOT
HEXOR (SUPER HORNET)


1. ABSTRACT ART
KEYWORDS: (1) Hardworking (2) Wisdom (3) Gentle


FIRST MODEL
FORM: Seven boxes limitation
SECOND MODEL
TRANSFORMATION: Subtract the hierarchy (big box) and the side boxes

THIRD MODELTRANSFORMATION & CONTEXT: Transform the hierarchy into colony ball form (volume). Side boxes transform into hexagon boxes with different angle (upside down). Context of my model is parasite with inspired by the hornets always building their colony which parasite the decay-wood or tree trunks.


FOURTH MODEL
OPENING: changing the hexagon boxes into continuous form, open the hierarchy (colony ball), and the side boxes too.

 
FIFTH MODEL
SPACE & ACTIVITIES: Transform whole model into one form, play with the semi-enclose, enclose and structural openings. besides, i start to doing in the scale, which is 1:25.
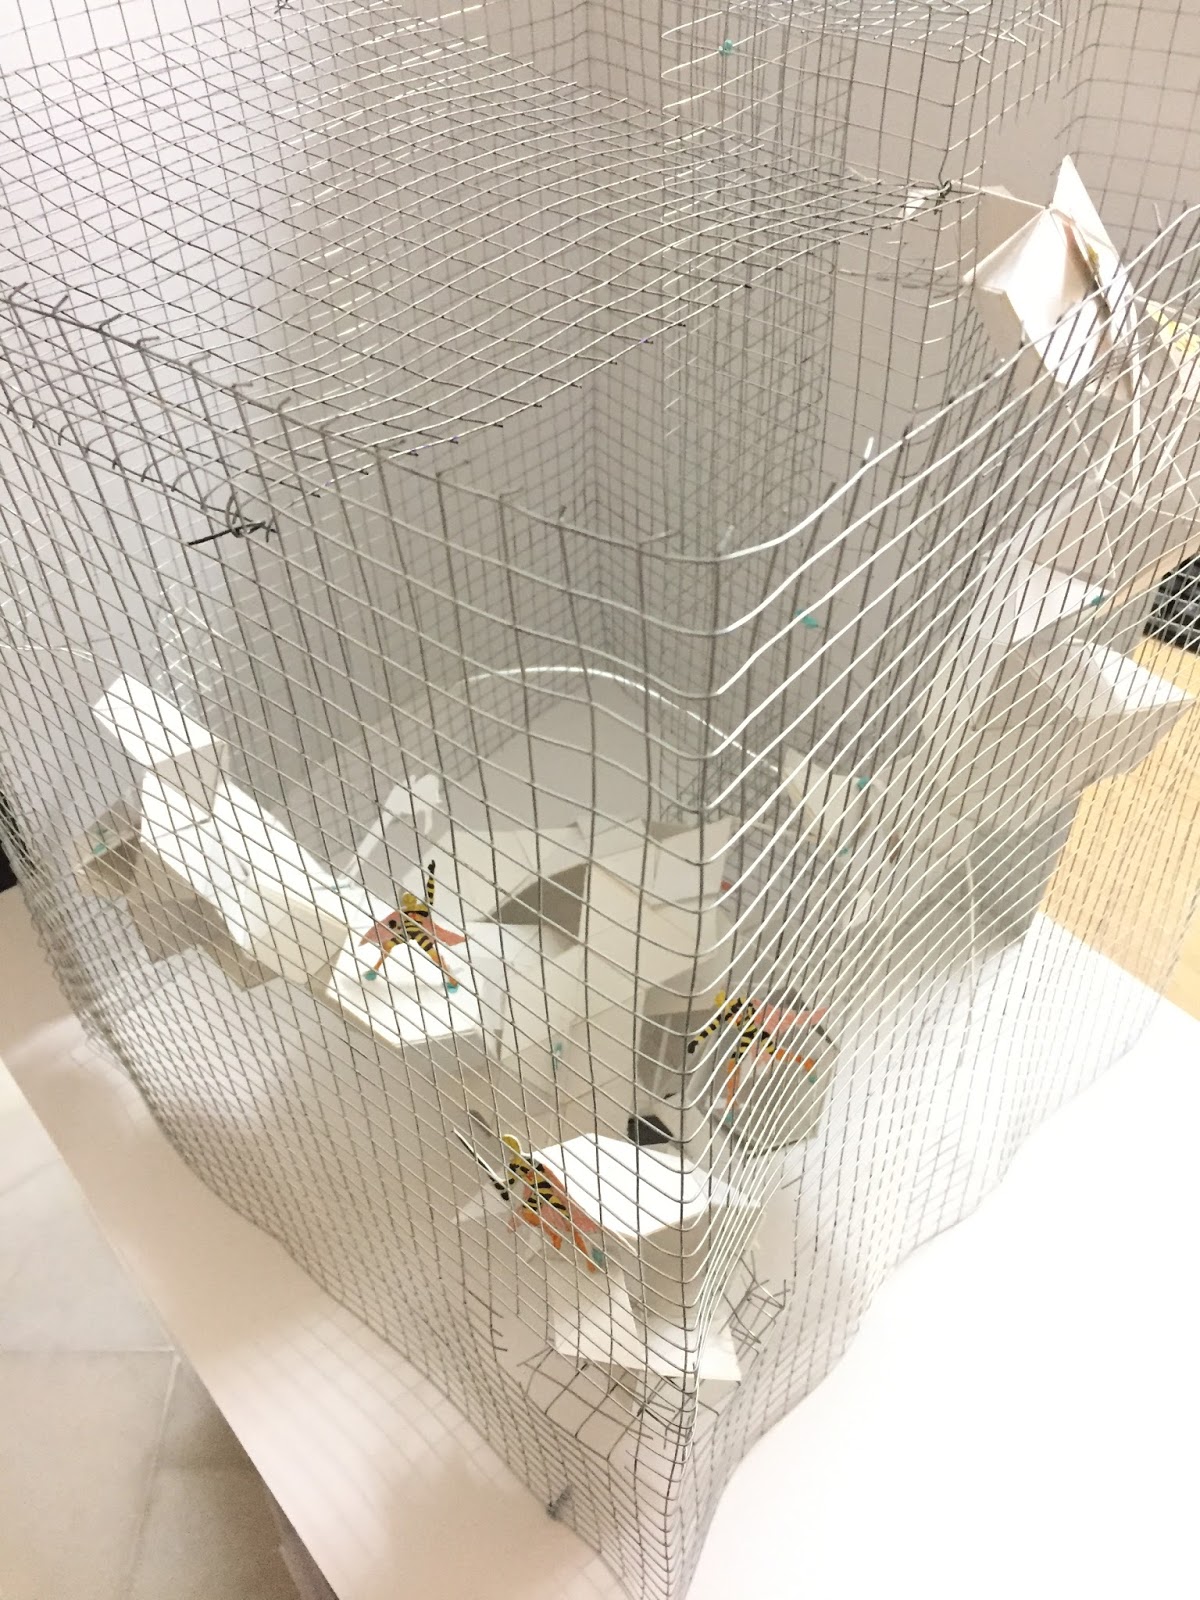


FINAL MODEL
Model was changing three times, so, this is the final model look like!! :D
PRESENTATION BOARD
FINAL PANEL BOARD
REFLECTION: After the final presentation, i feel like i free from the stress. because of this assignment, i lack of sleeping, hungry everyday, miss the meals and bath one time one day. Besides that, i learn how to get inspiration from one thing, and the anthropometric and the transformation also. i really know how the design come from. thanks for the lecturer give me the nice lecture to learn a lot, thanks a lot. ^^

Tuesday, November 29, 2016

SITE STUDY: AISYAH'S HOUSE

For this assignment site study, i really learn a lot of loft information. Besides that, this is also my first time taking the measuring tape to measure the height the width of construction elements. When doing this assignment, this is quite a big challenge for me, because i am the one who doing the different thing compare to the other classmates. I try my best to learn the loft and put the effort to understand the construction. During site study, we go to Aisyah's house two times. i try to understand the floor plan of the house, try to find the location of the loft. But now, I feel glad with a graceful heart that I have learned a lot in critical thinking, thanks Ms Sharon for giving the opportunity for us to study.
Panoramas effect photo taking

opening (two window) in the loft

loft view

What is loft?
A loft can be an upper storey or attic in a building, directly under the roof.

Building a loft consists of plenty of accurate measuring, purchasing the proper wood type and length, buying the correct bolts and screws, and assembling your loft in the proper area.

Plan of loft

How to install loft?

FRAMEWORK   INSTALLATION
1. Wall stud installed
2. Floor joist installed
3.Ceiling joist installed
4. Rafters installed
5. Bracket installed


WHAT IS THE WHOLE STEPS TO INSTALL A LOFT?
1) Steel beams and supporting floor beams are installed.
2) Floor joists and floor boards are installed.
3) Dormer window is constructed and roof lights fitted.
4) The loft room is insulated.
5) Internal partitions are built and plasterboard is fitted.
6) The ceiling is cut out and the staircase is fitted.

Functions of loft
- chill-out zone
- office space
- bathroom
- bedroom
- studio
- storage
Example Loft: BEDROOM

Loft labeling


Important details (recommended)
The biggest loft you can get
*best pitch angle 45°
*minimum ceiling height (2.1m)
*minimum thickness of insulation fabric wool (270mm)
oversea house doing the ventilation for loft

Benefits of installing a Loft
(1) The opportunity to create more living space
(2) Increasing the value of your home by up to 20%
(3) Avoid eating up the garden with an extension
(4) Use the extra space for whatever you need, including the popular bedroom


Loft Conversion Planning Permission
(1) There is to be no extension of the roof space
(2) There is to be no extension higher than the top of the roof
(3) All materials used should be in keeping with the property’s look
(4) There will be no verandas, balconies or raised platforms.


Personal Critical Thinking (Extra Information) 
These questions come out when I doing my work......

 Question 1:How can I Convert my Loft With a Low Head Height?

Solution 1: Raise the Roof
This would involve removing part or whole of the existing roof, and rebuilding it to give the required height and structure. This is structurally feasible, but the major problems are the high cost and getting planning permission approval. If the whole roof area needs removing, a covered scaffold structure, to protect the house from the weather during the works, would also be required.

Solution 2: Lower the Ceiling in the Room Below
The ceiling height in some rooms in older properties may be 3m or more, so if the roof space height is limited there is the option of lowering the ceilings below, providing it still allows at least 2.4m. This will require all the existing ceilings in question to be removed, causing much mess. With this method a plate will need to be bolted to the wall using shield anchors or rawlbolts, for the new floor joists to hang from. There is also a need for a suitable tie between the roof structure and the dwarf wall formed, to prevent the roof spreading. 

Question 2:  How to insulate your loft?

1) Calculate how much loft insulation you need
2)  Insulating your cold water tank (option)
3) measure the depth of joist then fit the insulation loft
5) lay on top of joist
6) press down lightly
7) cut and allow ventilation.

FABRIC WOOL

INSTALL THE FABRIC WOOL BETWEEN THE JOIST

Tuesday, November 8, 2016

HOUSE MODEL MAKING


REFLECTION: After doing this assignment, i feel unbelievable. This is my first time doing house model making, i really take time and put my effort to do this. I enjoy in this assignment even it take several overnight to do it, but i feel is it worth. I learn how to put the scale into the furniture and make it out. i do the work that before i think i cannot do it, well done!

3D OBJECT (FURNITURE) PROJECTION

ONE POINT PERSPECTIVE


 TWO POINT PERSPECTIVE


REFLECTION: FOR DOING THIS ASSIGNMENT, I FEEL SO INTERESTING BECAUSE I NEED TO DRAW THESE FURNITURE IN PERSPECTIVE WAY. THE TWO POINT PERSPECTIVE IS MORE HARDER TO DRAW THAN THE ONE POINT PERSPECTIVE DRAWING. BY THE WAY , I LEARN A LOT DRAWING TECHNIQUES IN THIS ASSIGNMENT. A GOOD START FOR ME!

ORTHOGRAPHIC PROJECTION


REFLECTION:  FOR DOING THIS ASSIGNMENT, I FEEL HAPPY AND RELAX BECAUSE THIS ASSIGNMENT IS THE MOST EASIER TO DO AND IS INTERESTING AMONG THE ALL ASSIGNMENTS THAT BE GIVEN. WHEN DOING THE ASSIGNMENT, I FEEL FUN BECAUSE I NEED TO THINK IN DIFFERENT WAY OF THE DIFFERENT VIEW,. BESIDES THAT. I NEED TO DRAW THAT THE OBJECT THOSE CAN SEE AND THOSE CANNOT SEE FROM DIFFERENT ANGLE VIEW. I AM EXCITED TO LOOK FORWARD TO DO IN THE HOUSE MODEL VIEW.

PERSPECTIVE PROJECTION

ONE POINT PERSPECTIVE

TWO POINT PERSPECTIVE


REFLECTION: When doing this assignment, i feel interesting and fun, when drawing in perspective way, i feel i am a designer, because my mind think that a designer always draw this kind of drawings. after finish this assignment, i am not satisfied, i need to put more effort and spend more time to learn the skill of drawing perspective. By the way, this assignment give the precious experience to me.

Sunday, November 6, 2016

HATCHING TECHNIQUE


CAPSICUM CONTOURING


LADYFINGERS CONTOURING


 4 TECHNIQUES

1. HATCHING2. CROSSHATCHING3.SCRIBBLING4. STIPPLING

Tuesday, September 27, 2016

ARCH PROJECT


MAKING & TESTING

STEPS OF MAKING 

 
1.   We mix up the clay, and make it like marbles pattern, then cut into cube shape.

2.  We build the arch column (2pcs) by sticking clay together, then, we stacking up till 3 inches.
3.   We build extra clay blocks and stick together at the column to make the bottom
stronger. We use satay sticks to make the framework to support the arch when we building.
4. Arch in progress....

5.   We finish building the Arch by cutting the shape in degree (arch) . Then, we remove the framework.

6.   Arch complete, we also put some more clay to cover the column and arch to make it more stable and nicer. 
Name Arch: PLAYBOY WONDERLAND


TESTING SESSION
READY TO TEST
ADDING MORE PHONES

10 iPhone ALREADY
11 PHONES!! AND ONE NOTEBOOK!!
But, the Arch is becoming flat and start collapse...
Reflection: After doing this assignment, i really interesting and enjoy it. During the progress, i realize that construction of a building is totally difficult. One of main point that i learn form this assignment is the stability of arch and the composition of arch. The different ways to compose arch, it got different ways to support. After the failure, i think the problems are the shape of each blocks (Arch) are not the same then cause it become flat and the bottom part of columns are not strong then cause it to collapse. I will suggest to make the columns thicker and the make the arch nicer and compose it well than before, i think stand for 20 iPhone is not a dream.